How To Draw A Dog


1
In this very instructional step I show you the skeletal anatomy of the common dog. The parts of bone structure I show you are the most important areas to focus on. Paws and heads of a dog can be the most challenging part. Drawing the body alone is al
2
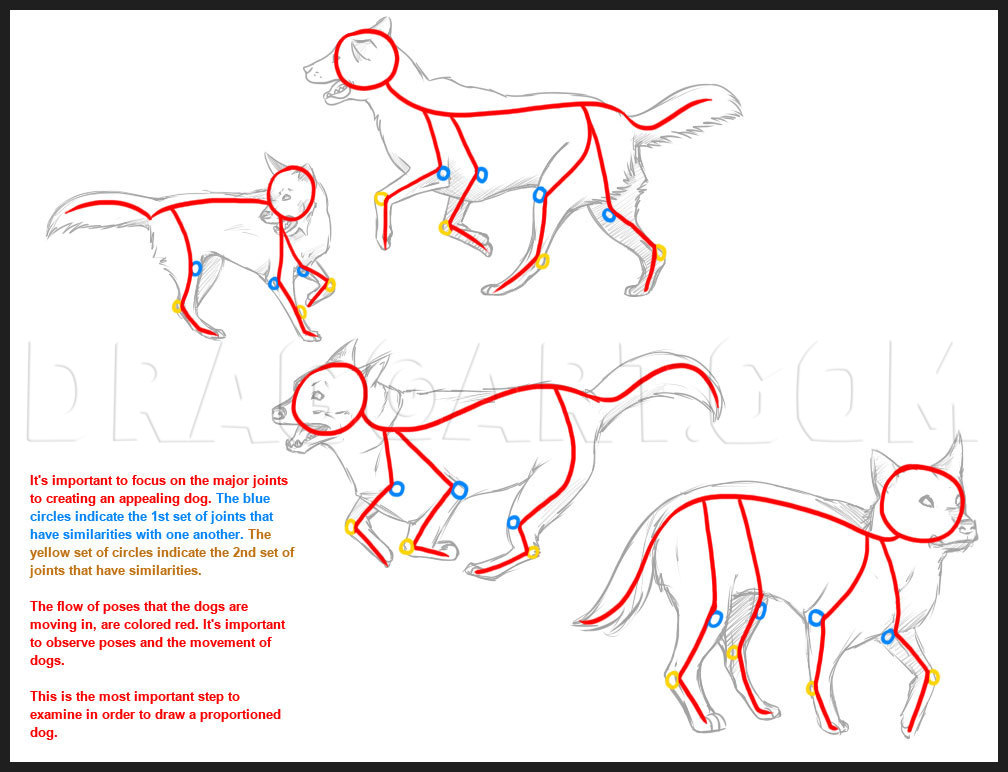
It's important to focus on the major joints to creating an appealing and accurate dog. The blue circles indicate the 1st set of joints that have similarities with one another. The yellow set of circles indicate the 2nd set of joints that have similar

3
This step basically shows you what parts of a dog is called. There are artists that draw dogs well and fail realizing what the names of different body parts are. I myself found out some of the names for them I never know about. Hocks should be drawn

4
In this first step, draw the very basic guidelines for the dog. Start with the three circles. The first is the head, then the chest and then the abdomen. The chest is almost always larger then the back end. Smaller dogs have a slight difference. Add

5
Start this step by drawing the muzzle and mouth of the dog. It's always better to start off with the head. Working your way from top to bottom has a better outcome. From this point of view of the dog, you will only see a slight indication of a nose.

6
Begin this step by simply drawing the withers, shoulder, and hip. The circles will help structure the pose of the canine so it saves you lots of time. After you've done this, finish off the chest and mouth.

7
Start off by drawing the rest of the forelegs. See how drawing from top to bottom is better then drawing in random places? For other artists it may be different techniques. Force is pushing this dog forward as it runs, so it would be realistic to hav

8
Get ready to finish off the hind legs. To make things easier, start off with the upper thigh and then the paw. Remember, the hock is always shorter then the length of it's knee. Have the hock set a bit lower on the ground so it doesn't have a distort

9
This is basically the last step to completing the dog. Drawing your way out of this step will be much easier than the others. Finish off the back of the hind leg and your all done!

10
The outcome of your line art should look similar to this. If your satisfied with your drawing, you've achieved drawing a dog successfully! It can be hard your first time, but practice is always at hand. No matter how discouraged you get, keep practic
Comments 0
Details
December 28, 2007
Description: The dog I will be drawing today is a Corgi. I used to own one of these dogs a long time ago. They're soooooo pudgy! To me the Corgi looks like a thick version of a Chihuahua. Yeah sure the legs are a lot shorter and the body is a lot longer, but the Corgis face looks just like a Chihuahuas face. Since I like giving some brief 411 on the images I put up here, read these fun facts about this breed. First off the Corgi has been considered to be a separate breed for about 70 years. These small fun dogs are decedents from the Swedish Vallhunds that were brought to Wales by the Vikings in the 800’s. They are a hardy intelligent dog, and they are obedient, protective, devoted dogs. Their life expectancy is around 10-15 years which means you definitely get your moneys worth, not only with price but with companionship as well. In this tutorial I will teach you the basic know how to complete a sketch of a Corgi dog. I decided to draw this adorable pouch because it looked simple to sketch out. Maybe I should have showed you how to draw puppies in stead, because the shape of a Corgi is a bit head scratching to draw. Don’t get discouraged, the whole purpose of a tutorial is to provide you with the steps so you don’t have to figure out "how to draw a dog" image from scratch. Well have fun with this project, and you don’t have to put a snowy background if you don’t want to. I actually added that in Photoshop but you can add what you like.


